 Last updated: August 19th, 2024
Thermostat Trouble? Common Issues and How to Fix Them
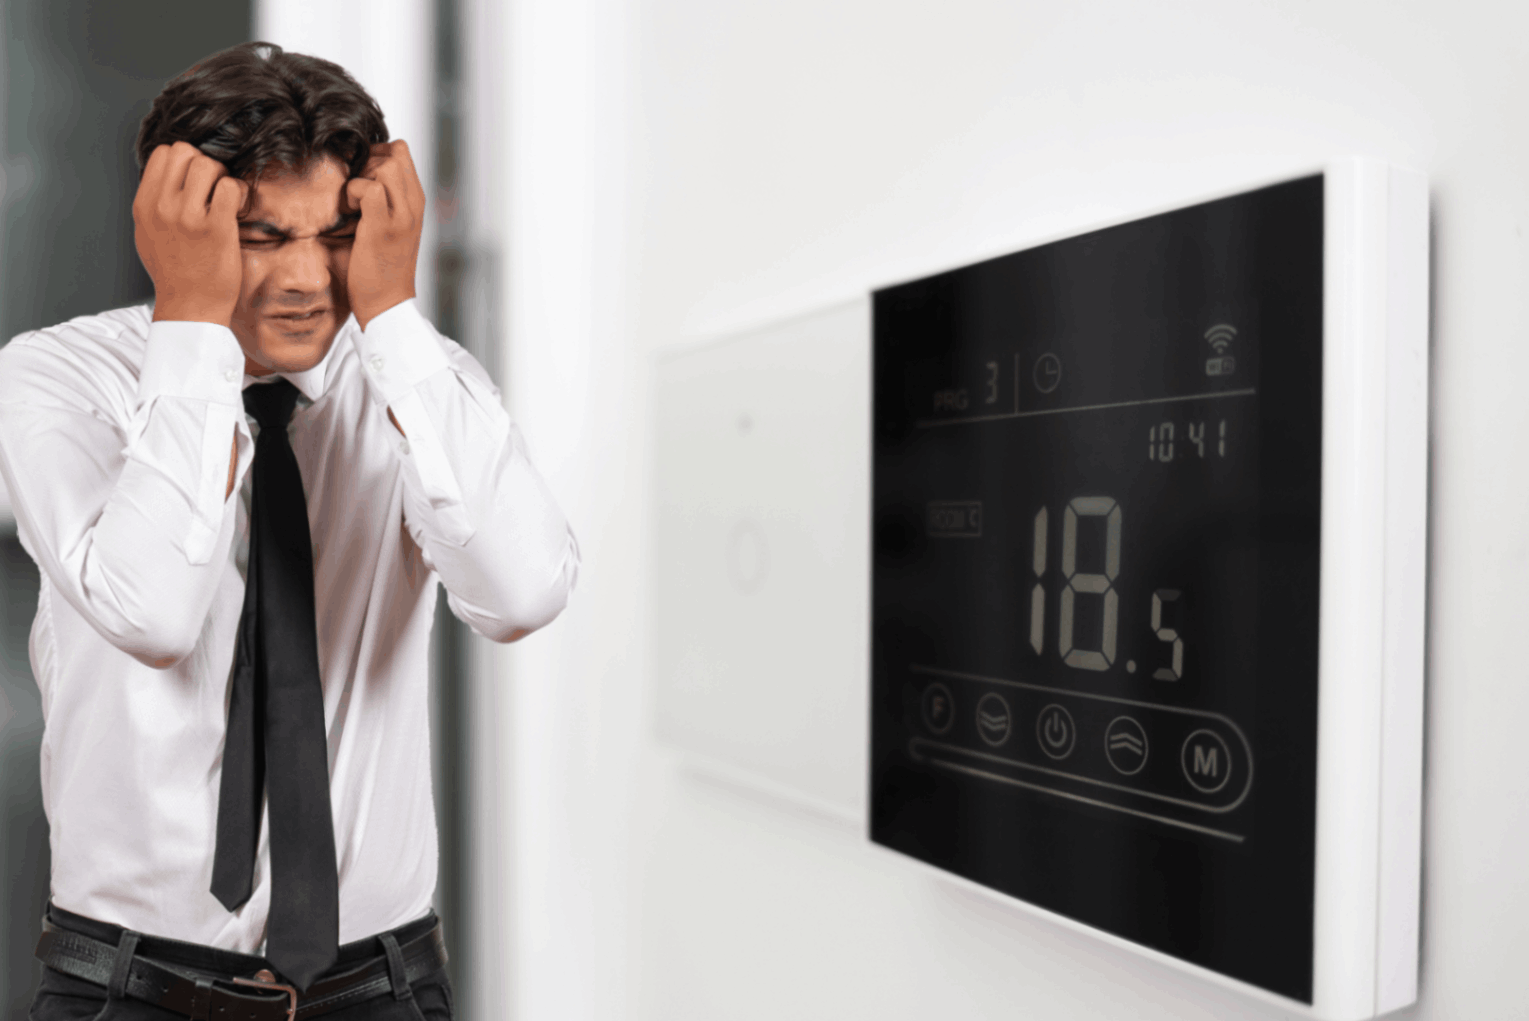
Thermostats are essential for maintaining a comfortable indoor environment, whether in a residential or commercial setting. However, thermostats can experience issues that disrupt their functionality like any other device. This blog will explore the various types of thermostats, their importance, common issues, and practical solutions.
Types Of Thermostat
There are several types of thermostats, each offering varying levels of functionality and complexity:
1. Manual Thermostats
The most basic type, manual thermostats, offer a simple dial or buttons to adjust the desired temperature. They use a mercury switch or a bimetallic strip to sense the room temperature and turn the heating/cooling system on or off accordingly. These are reliable and affordable but lack programmability and advanced features.
2. Mechanical Thermostats
Similar to manual thermostats, mechanical thermostats also use a bimetallic strip for temperature sensing. However, they typically offer a more user-friendly interface with a slider or lever to adjust the temperature setting. They may also include a basic on/off switch and a limited temperature range.
3. Digital Thermostats
These thermostats replace the bimetallic strip with an electronic sensor and offer more precise temperature control with a digital display. They allow setting a specific desired temperature and often include features like a fan control and a basic clock. Some digital thermostats may even offer rudimentary programming options.
4. Smart Thermostats
The pinnacle of thermostat technology, smart thermostats connect to your Wi-Fi network and offer remote access. You can control your temperature from anywhere using your smartphone, integrate with smart home systems, and even learn your routines for ultimate convenience and energy savings. Smart thermostats come with a wide range of features and functionalities.
5. Programmable Thermostats
Take control of your comfort with programmable thermostats. These allow you to set different temperature settings for various times or days of the week, ideal for optimizing energy use when you’re away or asleep. Programmable thermostats typically use digital interfaces and offer a variety of scheduling options.
Parts Of Thermostat
Understanding the components of a thermostat can be beneficial for troubleshooting and maintenance. Here are the critical parts of a thermostat:
- Display Screen: This screen shows the current temperature, set temperature, and other settings. On smart thermostats, it might also display Wi-Fi connectivity and weather updates.
- Temperature Sensor: This measures the ambient temperature to determine if the HVAC system should be activated.
- Control Buttons/Touchscreen: This allows users to adjust the temperature and settings. Older models might have physical buttons, while newer models often feature a touchscreen.
- Power Source: This can be hardwired to the electrical system or powered by batteries. Smart thermostats may also be connected to a common wire (C-wire) for continuous power.
- Wiring Terminals: This helps in connecting the thermostat to the HVAC system. Different terminals control various functions, such as heating, cooling, and the fan.
- Mode Switch: This allows switching between heating, cooling, and off modes. Some thermostats also have an automatic mode that switches between heating and cooling as needed.
- Programming Interface: Found on programmable and smart thermostats, this interface allows users to set schedules and preferences.
- Communication Module: On smart thermostats, this module connects to Wi-Fi or other communication protocols to enable remote access and smart home integration.
Understanding these components helps diagnose problems, perform maintenance, and make informed decisions about upgrades and replacements.
Importance Of Thermostat
Thermostats offer far more than just keeping you comfortable. Here’s how they play a vital role in our daily lives:
- Energy Efficiency: Programmable and smart thermostats can significantly reduce energy consumption by automatically adjusting temperatures when you’re not home. This translates to lower energy bills and a reduced environmental impact.
- Comfort Control: Precise temperature control ensures a pleasant and consistent environment, improving well-being and productivity.
- Safety Features: Some thermostats have built-in safety features, such as overheating protection or frost prevention, for added peace of mind.
- Building Automation: Smart thermostats integrate seamlessly with smart home systems, allowing for centralized control and automation of your home environment.
Common Thermostat Issues & Troubleshooting Tips
Thermostats are essential for maintaining a comfortable indoor environment, but they can sometimes encounter issues that disrupt their functionality.
Understanding and troubleshooting these common problems can ensure your thermostat and HVAC system work efficiently.
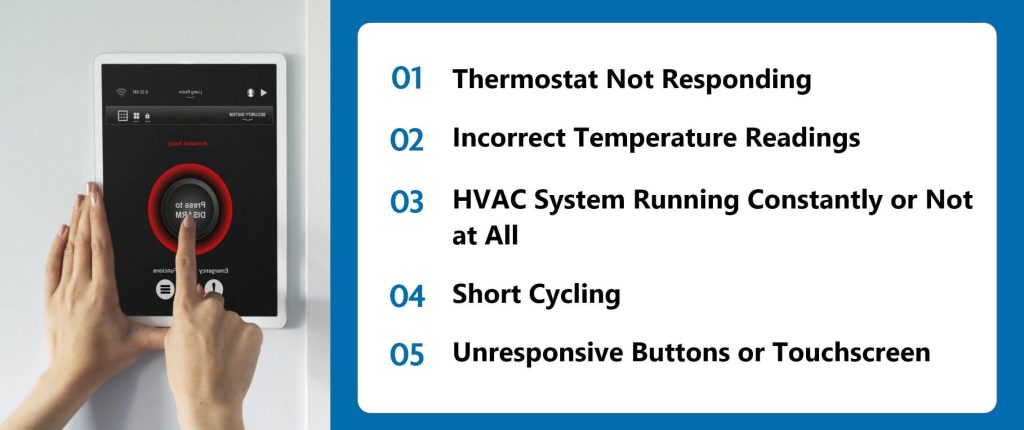
1. Thermostat Not Responding
Issue: The display is blank or unresponsive.
Troubleshooting Tips:
- Check Power Source: Ensure the thermostat is connected to the electrical system or has fresh batteries. A lack of power can cause the display to be blank or unresponsive.
- Verify Circuit Breaker: Make sure the circuit breaker connected to the thermostat is not tripped. If it is, reset it to restore power.
- Check Wi-Fi Connection: Verify the Wi-Fi connection is active and stable for smart thermostats. A lost connection can cause the thermostat to stop responding.
2. Incorrect Temperature Readings
Issue: The thermostat displays a temperature that doesn’t match the room temperature.
Troubleshooting Tips:
- Proper Placement: Ensure the thermostat is installed away from heat sources, direct sunlight, or drafts. Incorrect placement can lead to inaccurate temperature readings.
- Clean Internal Components: Dust and debris can accumulate on the thermostat’s sensors, affecting accuracy. Use a soft brush or compressed air to clean the internal components regularly.
- Recalibrate: Follow the manufacturer’s instructions to recalibrate the thermostat if necessary. Recalibration can correct any inaccuracies in temperature readings.
3. HVAC System Running Constantly or Not at All
Issue: The heating or cooling system runs continuously or doesn’t turn on when it should.
Troubleshooting Tips:
- Correct Mode: Ensure the thermostat is set to the appropriate mode (heat or cool) based on the current weather conditions. Incorrect mode settings can cause the HVAC system to run continuously or not turn on.
- Check Temperature Settings: Verify that the temperature settings suit the current season. Adjust the settings as needed to maintain comfort indoors.
- Inspect Wiring: Check the wiring connections between the thermostat and the HVAC system. Loose or damaged wiring can prevent the thermostat from communicating properly with the HVAC system.
- Reset Thermostat: If all else fails, reset the thermostat to its default settings and reprogram it according to your preferences. Resetting the thermostat can resolve any software glitches or programming errors.
4. Short Cycling
Issue: The HVAC system turns on and off frequently, which can increase energy usage and wear out the system.
Troubleshooting Tips:
- Thermostat Placement: Ensure the thermostat is installed away from heat sources, such as lamps or appliances, and from drafts. Incorrect placement can cause the thermostat to detect temperature changes inaccurately, leading to short cycling.
- HVAC System Inspection: Conduct a thorough inspection of the HVAC system to identify any underlying issues causing short cycling, such as clogged air filters, refrigerant leaks, or malfunctioning components. Addressing these issues can prevent short cycling and improve energy efficiency.
- Upgrade Thermostat: Consider upgrading to a programmable or smart thermostat that offers advanced features such as adaptive learning algorithms and temperature scheduling. These thermostats can provide more precise control over your HVAC system, reducing the likelihood of short cycling and optimizing energy usage.
5. Unresponsive Buttons or Touchscreen
Issue: Buttons or touchscreen commands are not working.
Troubleshooting Tips:
- Clean Buttons/Touchscreen: Use a soft, dry cloth to clean the buttons or touchscreen. Dirt, dust, or residue buildup can interfere with the controls’ responsiveness.
- Check Hands: Ensure your hands are clean and dry when using the touchscreen. Moisture or oils from your hands can create a barrier between your skin and the touchscreen, preventing proper detection of touch inputs.
- Restart/Replace Batteries: If the thermostat is battery-powered, try restarting it by removing the batteries for a few minutes and then reinstalling them. If the batteries are old or depleted, replace them with fresh ones to ensure proper thermostat operation.
Maintenance Tips For Thermostat
Regular maintenance is critical to ensuring your thermostat operates efficiently and extends the life of your HVAC system. Here are some essential maintenance tips:
- Regular Cleaning: Dust and debris can affect the accuracy of your thermostat’s sensors. To keep it functioning correctly, clean the thermostat’s exterior and interior components with a soft, dry cloth regularly.
- Battery Replacement: For digital and smart thermostats, replace the batteries at least once a year. Low battery power can cause the thermostat to malfunction or become unresponsive.
- Proper Placement: Ensure your thermostat is installed optimally—away from direct sunlight, drafts, and heat sources. This helps maintain accurate temperature readings and efficient operation.
- Software Updates: Check for software updates from the manufacturer for smart thermostats regularly. Updates often include bug fixes, new features, and performance improvements.
- Recalibration: Periodically recalibrate your thermostat according to the manufacturer’s instructions. This ensures it provides accurate temperature readings and maintains your desired comfort levels.
- Check Wiring Connections: Inspect the wiring connections to ensure they are secure and intact. Loose or damaged wiring can cause the thermostat to malfunction.
- Professional Inspection: Schedule an annual inspection with a professional HVAC technician. They can check your thermostat and HVAC system to ensure everything is working correctly and address any potential issues before they become significant problems.
Following these maintenance tips, you can keep your thermostat in good working condition, optimize your HVAC system’s performance, and ensure a comfortable indoor environment year-round.
How Does A Home Warranty Protect Your Thermostat
A home warranty can provide valuable protection for your thermostat. It offers coverage for malfunctions and ensures that repairs or replacements are handled without significant out-of-pocket expenses. Understanding the specifics of this coverage can help you make the most of your home warranty plan.
1. Coverage for Malfunction
A home warranty typically covers the malfunction of your thermostat as part of your HVAC system. Here’s what you can generally expect:
- Repair Costs: If your thermostat malfunctions due to normal wear and tear, the home warranty will cover the repair cost, including parts and labor.
- Replacement Costs: If the thermostat cannot be repaired, the home warranty will cover replacing it with a similar model.
- Prompt Service: Most home warranty companies offer prompt service to address thermostat malfunctions quickly. Once a claim is filed, a licensed technician will be dispatched to diagnose, repair, or replace the thermostat.
- Comprehensive Protection: Home warranties generally cover various types of thermostats, including digital, programmable, and smart thermostats, ensuring comprehensive protection regardless of the type of thermostat installed in your home.
2. Exclusions to Consider
While home warranties offer significant protection, there are certain exclusions and limitations to be aware of:
- Pre-existing conditions are typically not covered.
- Lack of maintenance may void coverage.
- Cosmetic damages such as scratches or discoloration may not be covered.
- Improper installation or unauthorized repairs could exclude coverage.
- Excessive wear and tear or Damage from acts of nature might not be covered.
Top Home Warranty Companies Covering Thermostat Repairs
Several home warranty companies are known for their comprehensive coverage, including thermostat repairs. Here are a few top choices:
$100 OFF and Free Roof Coverage

Premium
$54.99 - $89.99
Deductible
$75.00 - $125.00
Coverage Limit
$4K - $5K
Why We Picked It
American Home Shield is a leading home warranty provider offering extensive coverage for HVAC systems, including thermostats. They provide flexible plans and an extensive network of qualified technicians.
$50 off + 1 Month Free

Premium
$46 - $55
Deductible
$75 - $125
Coverage Limit
Upto $3K/item
Why We Picked It
Choice Home Warranty is known for its competitive pricing and broad coverage options. Their plans typically cover thermostat repairs as part of their HVAC system coverage.
$150 OFF and 2 Months Free + Free Roof Coverage

Premium
$54.99 - $64.99
Deductible
$60.00 - $125.00
Coverage Limit
$3K/Item
Why We Picked It
Select Home Warranty offers affordable plans with coverage for thermostats in their HVAC protection. They also provide seasonal promotions and discounts.
Conclusion
Thermostats are vital for maintaining a comfortable and energy-efficient home. By understanding the types of thermostats, their importance, and common issues, you can troubleshoot and fix problems effectively. Regular maintenance and timely upgrades can also ensure your thermostat and HVAC system function optimally for years.


related articles
 Discover First American Home Warranty Locations and What You Need to Know About Their Cover.
 Reviews of Home Warranty Companies Show You How to Determine If Your Home Is Covered


- Free Instant Quotes
- Upto $200 Off
- Free Roof Coverage